Widgets
Widget Customization in Cetegra Workspace
The Cetegra Workspace Home page features an adaptable widget area, empowering each user to determine their widget visibility and arrangement.
While a default widget configuration is set based on your company’s preferences, you have the flexibility to modify this.
Here’s an overview of some available widgets.
Note: As we continue to evolve Cetegra Workspace, expect new widget introductions in upcoming releases.
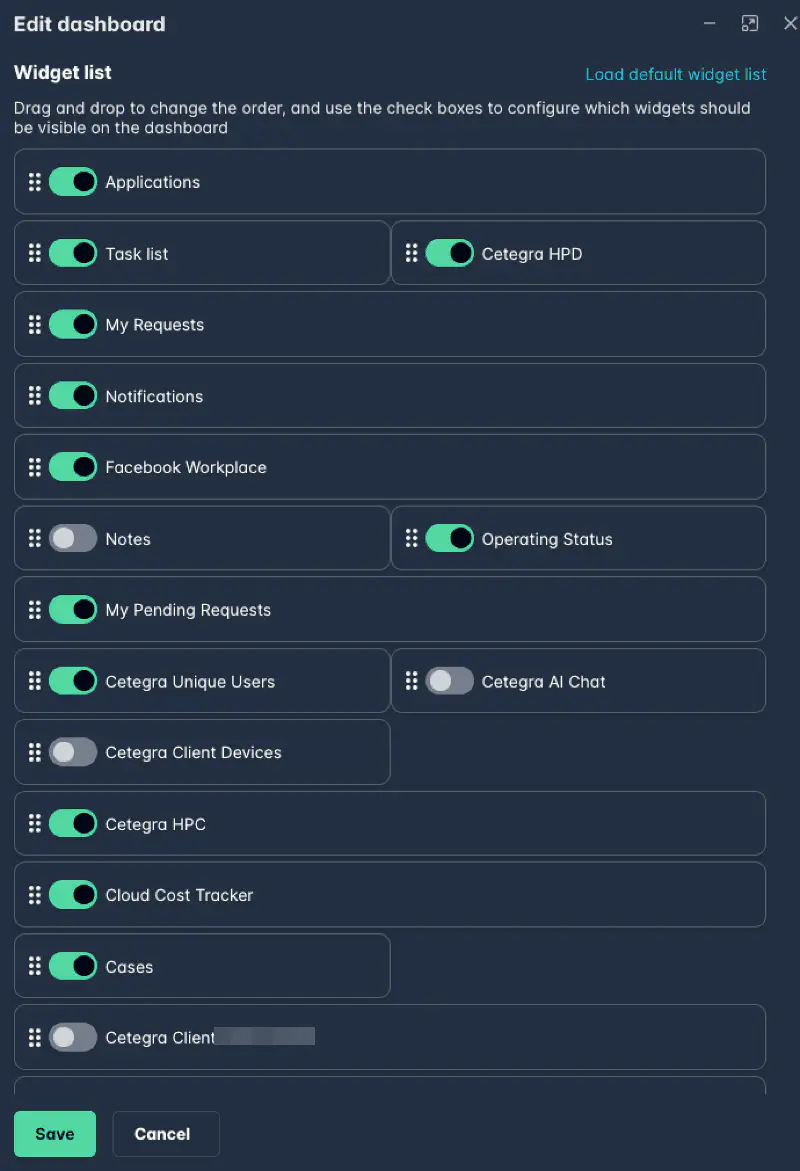
Editing Your Dashboard
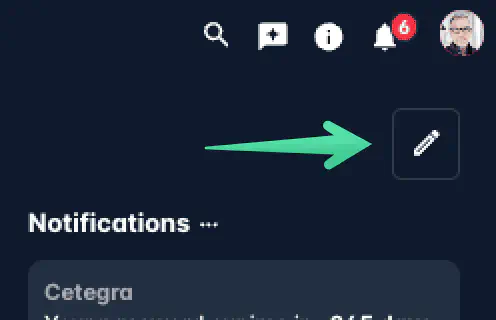
Customize your widget visibility and arrangement by selecting the Edit dashboard button at the top right.
To enable or disable widgets:
- Tick or untick the checkbox next to the widget name.
- Drag widgets to your preferred position.
- Always click Save to confirm changes!
Widget links
Click the menu icon (three dots) on a widget to access the direct link to that widget. This link can be shared with colleagues or saved for quick access.
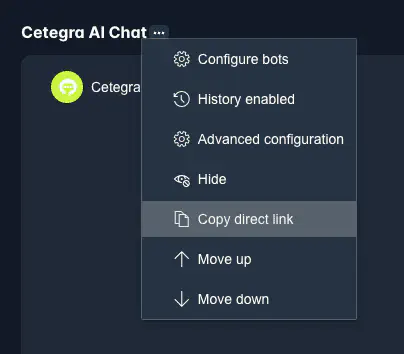
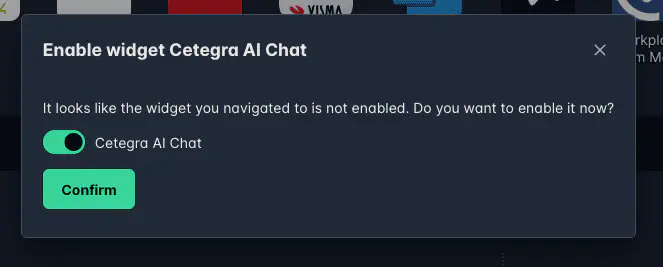
If the user does not have the widget enabled, they will be prompted to enable it.
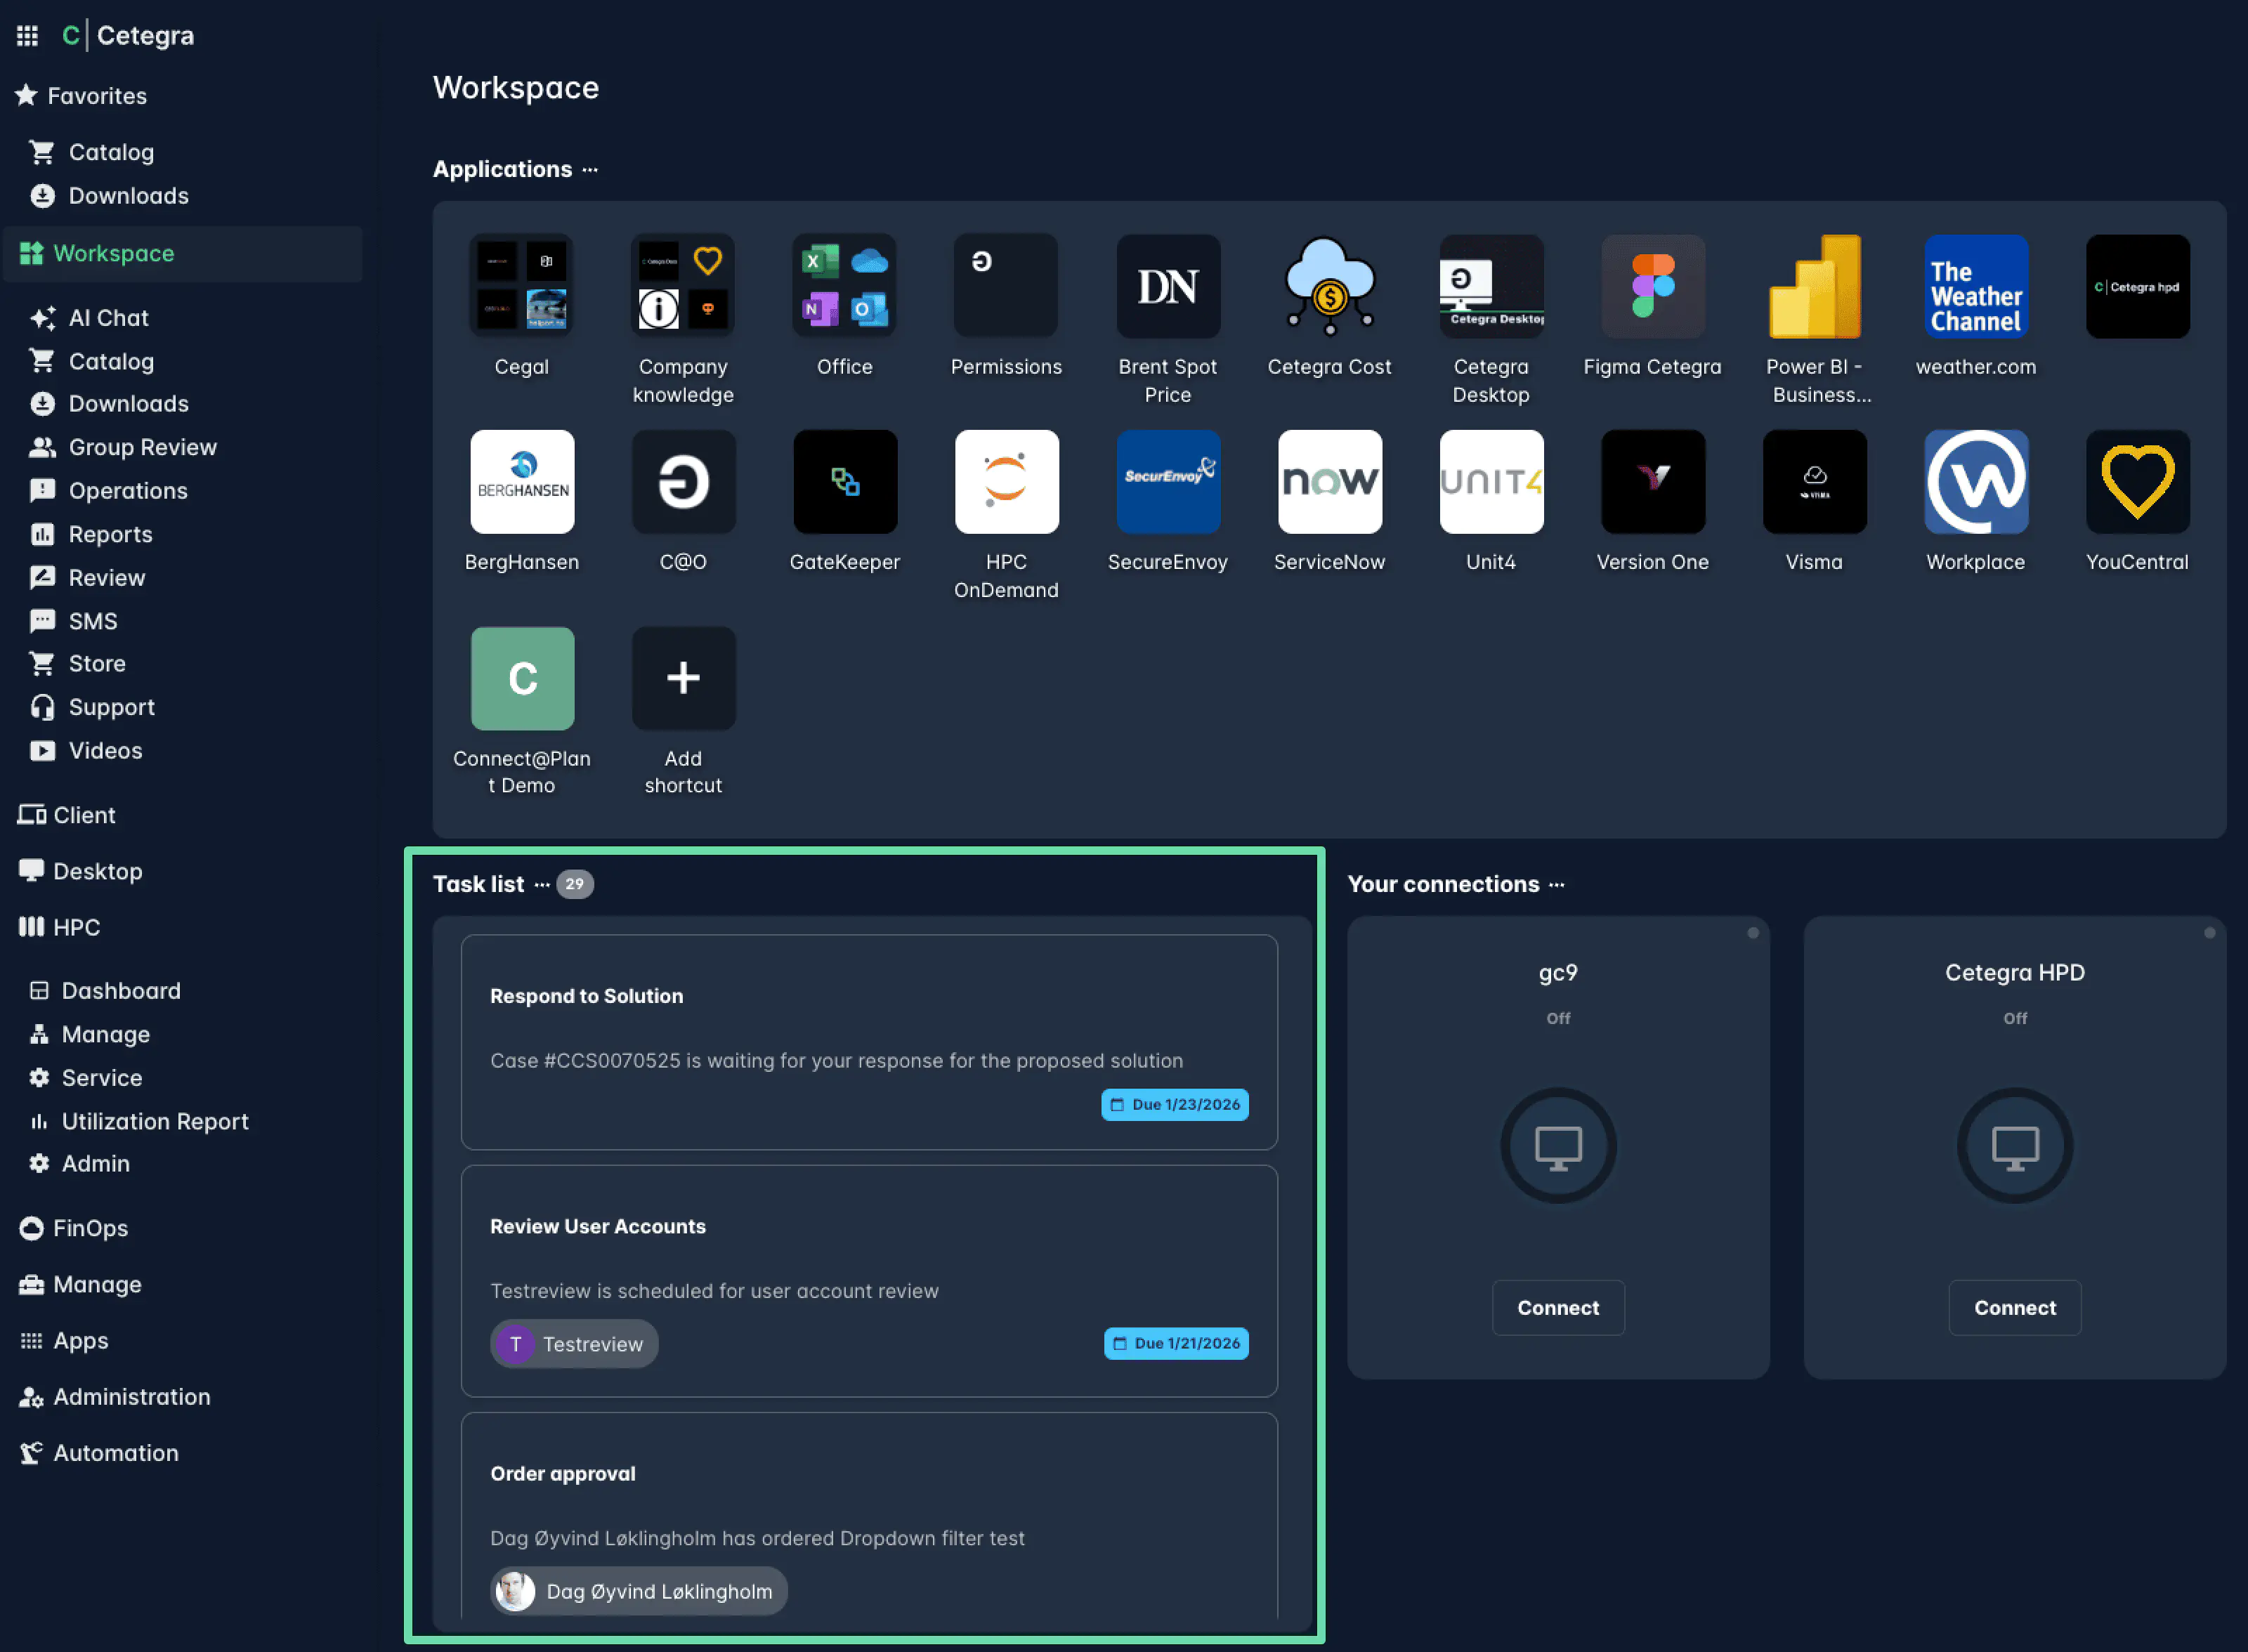
Applications Widget
The Applications widget gives you quick access to all applications available to you, as well as any custom shortcuts you have added yourself.
Apps are displayed in a compact tile layout for efficient use of space. The widget supports folders, search, and per-user customization.
📷 Add screenshot here
Searching for Apps
Use the search field at the top of the widget to filter apps in real time as you type. Clearing the search restores the full list.
Adding Shortcuts
- Open the widget menu (three dots on the widget title) and click Add shortcut.
- Enter the URL and optionally rename the shortcut.
- Select a folder (if you have any) or leave it as None.
- Click Save.
Your shortcut will appear in the widget immediately.
Editing Shortcuts
Open Edit shortcuts from the widget menu to manage your apps and shortcuts. In edit mode you can:
- Reorder items by drag-and-drop.
- Drag shortcuts into folders.
- Enable or disable shortcuts using the Plus and Minus buttons. (Note: custom shortcuts are permanently deleted when removed with the Minus button.)
To sort all apps alphabetically, click Sort alphabetically.
Customizing Icons and Colors
For shortcuts you have added yourself, you can change the icon and color:
- Enter edit mode via the widget menu.
- Click the edit controls on the shortcut tile.
- Choose a new icon or color and save.
Customizations are personal — they only apply to your account and do not affect other users.
Context Menu
Right-clicking a tile opens a context menu with quick actions for that app or shortcut.
Folders
Folders let you group related shortcuts together. When a folder is closed, it shows a small preview of up to four icons inside it. Opening a folder navigates into a dedicated folder view.
To create a folder:
- Click Add folder in the widget menu.
- Name the folder and click Save.
- Drag shortcuts into the folder, or assign a folder when creating a new shortcut.
Your Connections Widget
This widget provides a comprehensive list of your remote desktop sessions across all environments.

Utilize the Connect button to initiate a new session. The widget will display different buttons based on the session’s status.
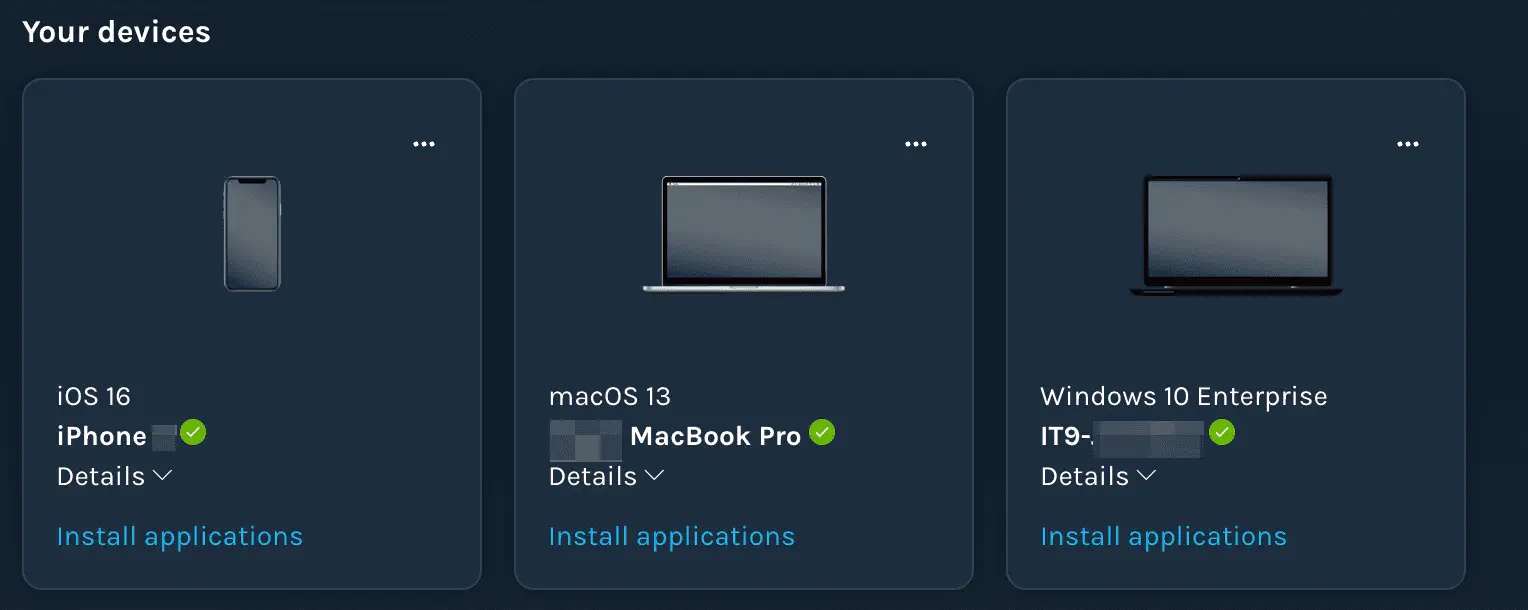
Your Devices Widget
Note: Exclusive to companies enrolled in the Cetegra Client service.
Here, you’ll find all devices registered under Cetegra Client. A device’s compliance status is represented by either a green checkmark (compliant) or a red exclamation mark (non-compliant). Execute various actions, such as installing apps or initiating a sync, by clicking the three dots next to the device name.
For more on Cetegra Client, explore here.
Tickets Widget
This section facilitates the creation, management, and review of user tickets within the ServiceNow digital workflow system.
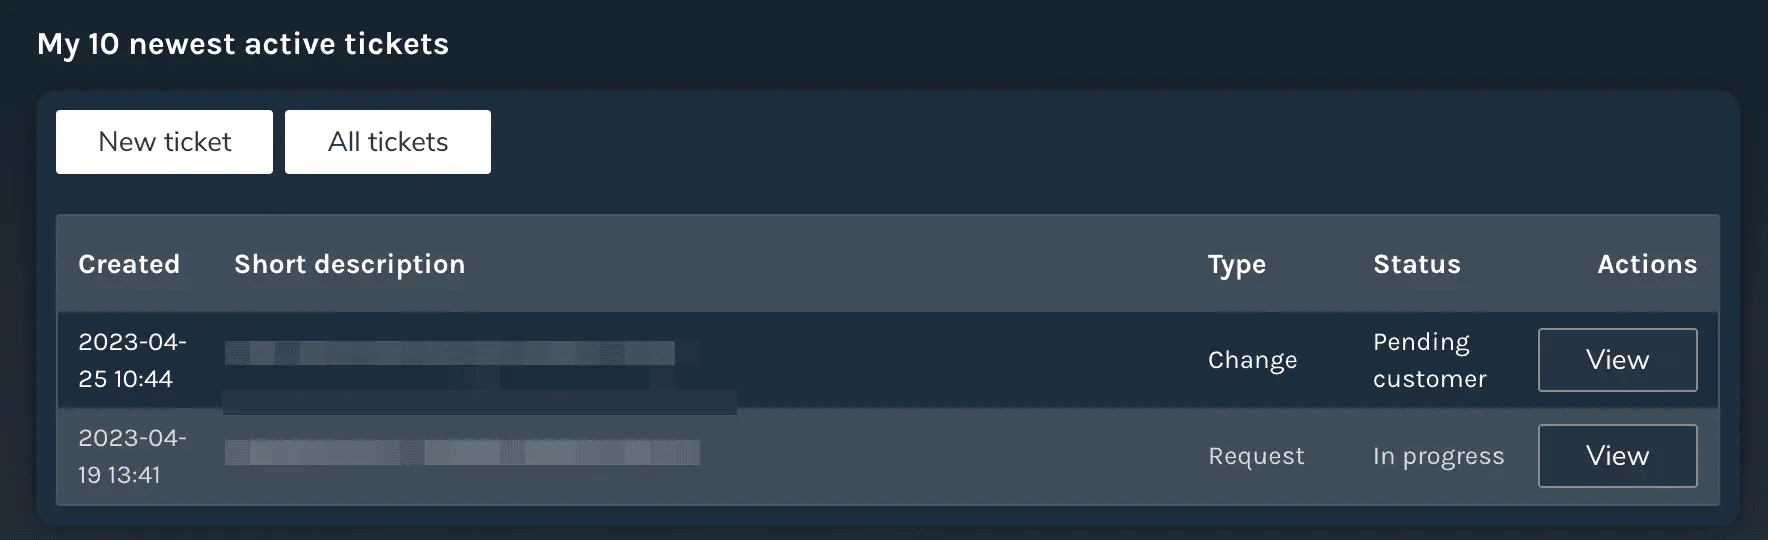
Note: An alternative ticket overview is accessible in the Support section (Navigation Pane: Workspace > Tickets).
Task List Widget
The Task List widget helps you stay on top of actions that require your attention across Cetegra Workspace. It brings together tasks from multiple modules into one consolidated view, allowing you to quickly understand what needs to be done and navigate directly to the relevant area.
The widget is designed to improve visibility, reduce waiting time in critical workflows, and provide clarity around your responsibilities in Cetegra.
How the Task List Works
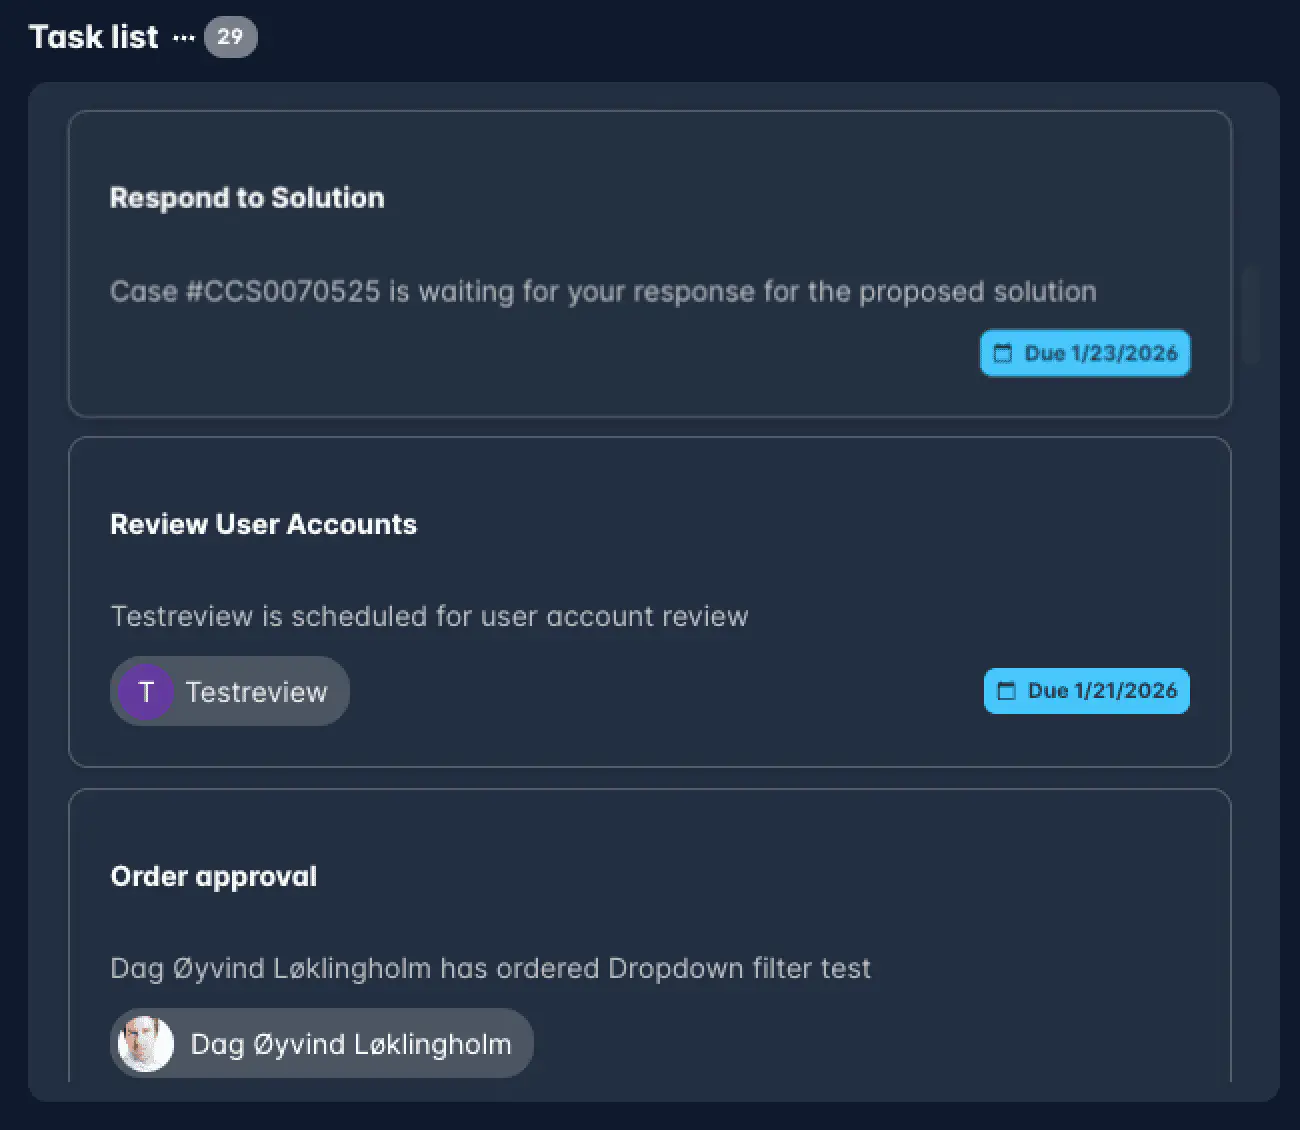
At the top of the widget, you will see the total number of active tasks assigned to you.
Can’t see the widget at all? As long as it has been enabled for your company, you may need to enable it in the Widget settings. Please see editing your dashboard.
Below this, tasks are displayed as individual Task Cards, each representing a specific action you need to take.
Each task card includes:
Task type (shown as the card title)
Description with relevant details
User or group tag, including profile image when available
Due date, if applicable
- Red indicates an overdue task
- Blue indicates an upcoming due date
Clicking a task card will take you directly to the correct module and page where the task can be completed.
Task Card Actions
When you hover over a task card, a three-dot menu appears in the top-right corner.

From this menu, you can:
- Dismiss the task from your Task List (This removes it from the widget only and does not affect the underlying system or workflow.)
- Approve or Decline (available for order approval tasks)
Supported Task Types
The Task List currently includes tasks from the following Cetegra modules:
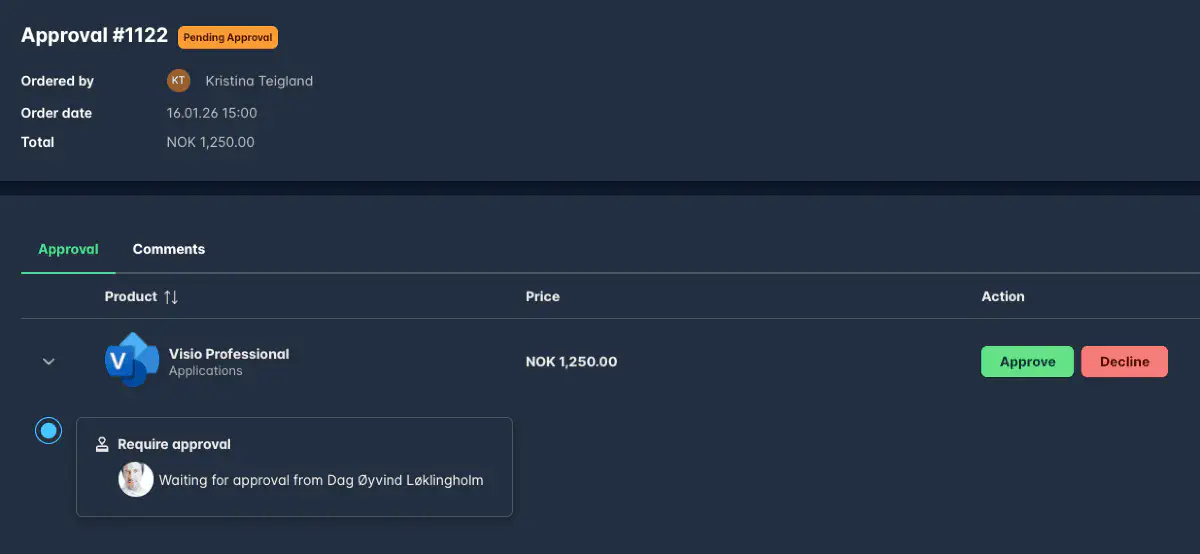
Order Approval
Shows catalog orders where you are assigned as an approver.
- Displays who placed the order and what was ordered
- Handles multiple products (for example: “Product A + 2 more items”)
- Clearly indicates when an order was submitted on behalf of another user
- Orders can be approved or declined directly from the task card
- Clicking the card opens the order approval page in the Catalog
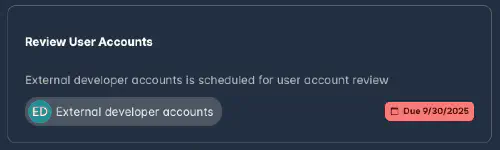
Review User Accounts
Lists review tasks where you are assigned as a reviewer for user accounts.
- Shows the review name and due date
- Clicking the card opens the review page
Review Group
Displays group review tasks that require you to review group membership.
- Shows group name and due date
- Clicking the card opens the group review module, where users can be added or removed
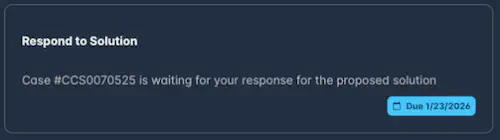
Accept Solution
Related to the Support (Cetegra Care) module.
- Appears when a support agent has proposed a solution to a case you created
- Clicking the card opens the relevant support case for review and acceptance
Review Budget Threshold
Triggered when a cloud budget exceeds its defined threshold.
- Related to the Cloud Cost Tracker module
- Clicking the card opens the budget configuration page, where thresholds can be adjusted
Device Setup
Related to the Cetegra Client module.
- Appears when a device setup process requires attention
- Clicking the card opens the relevant device setup page
Assistants
Related to the Cetegra AI module.
- Appears when an AI assistant is ready to be set up or requires action
- Clicking the card opens the AI assistant configuration page
Task List Settings
You can customize how tasks are displayed and prioritized.
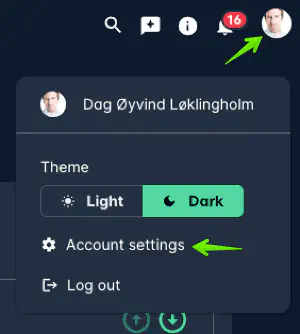
To access settings:
- Click your profile image in the top-right corner
- Select Account Settings
- Open Task List from the side menu
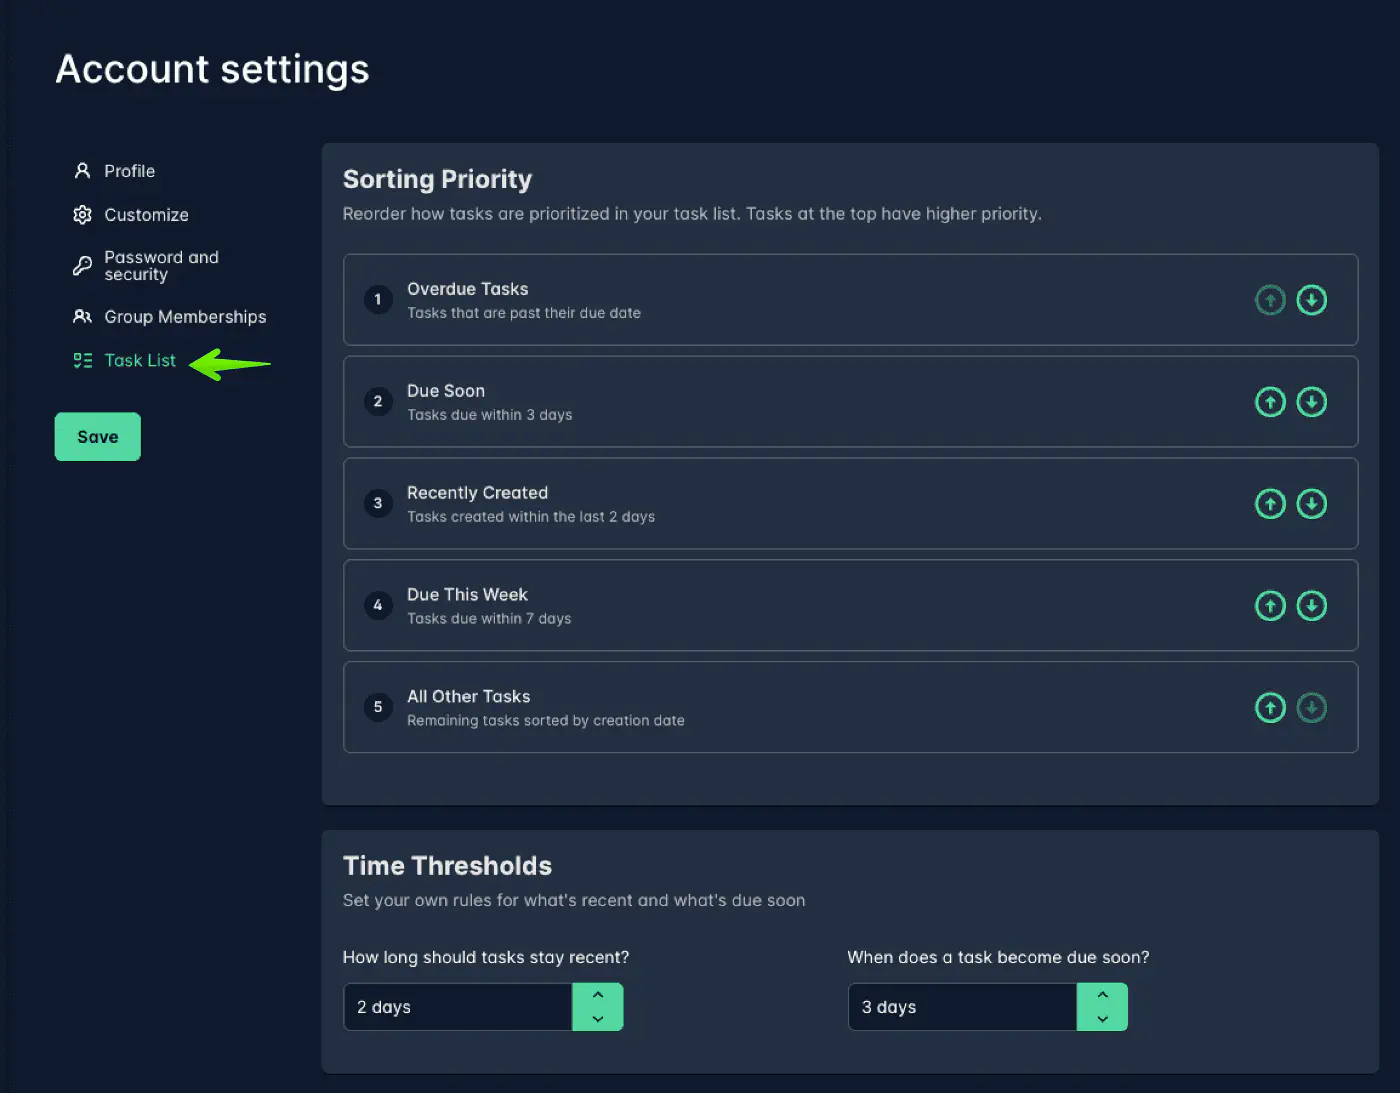
Sorting Priority
You can reorder how tasks are prioritized in your list. Tasks at the top have the highest priority.
Default order:
- Overdue tasks
- Due soon (within 3 days)
- Recently created (last 2 days)
- Due this week (within 7 days)
- All other tasks (sorted by creation date)
Time Thresholds
You can adjust what Cetegra considers recent and due soon:
- How long should tasks stay recent? (Default: 2 days)
- When does a task become due soon? (Default: 3 days)
Task Notifications
Choose which task types you want to see in your Task List.
- Muted task types will be hidden from the widget
- Changes take effect immediately
Cetegra AI Chat
Available only for customers with the Cetegra AI addon.
Harness the capabilities of GPT 3.5, OpenAI’s cutting-edge language processing AI, seamlessly integrated into your workspace.
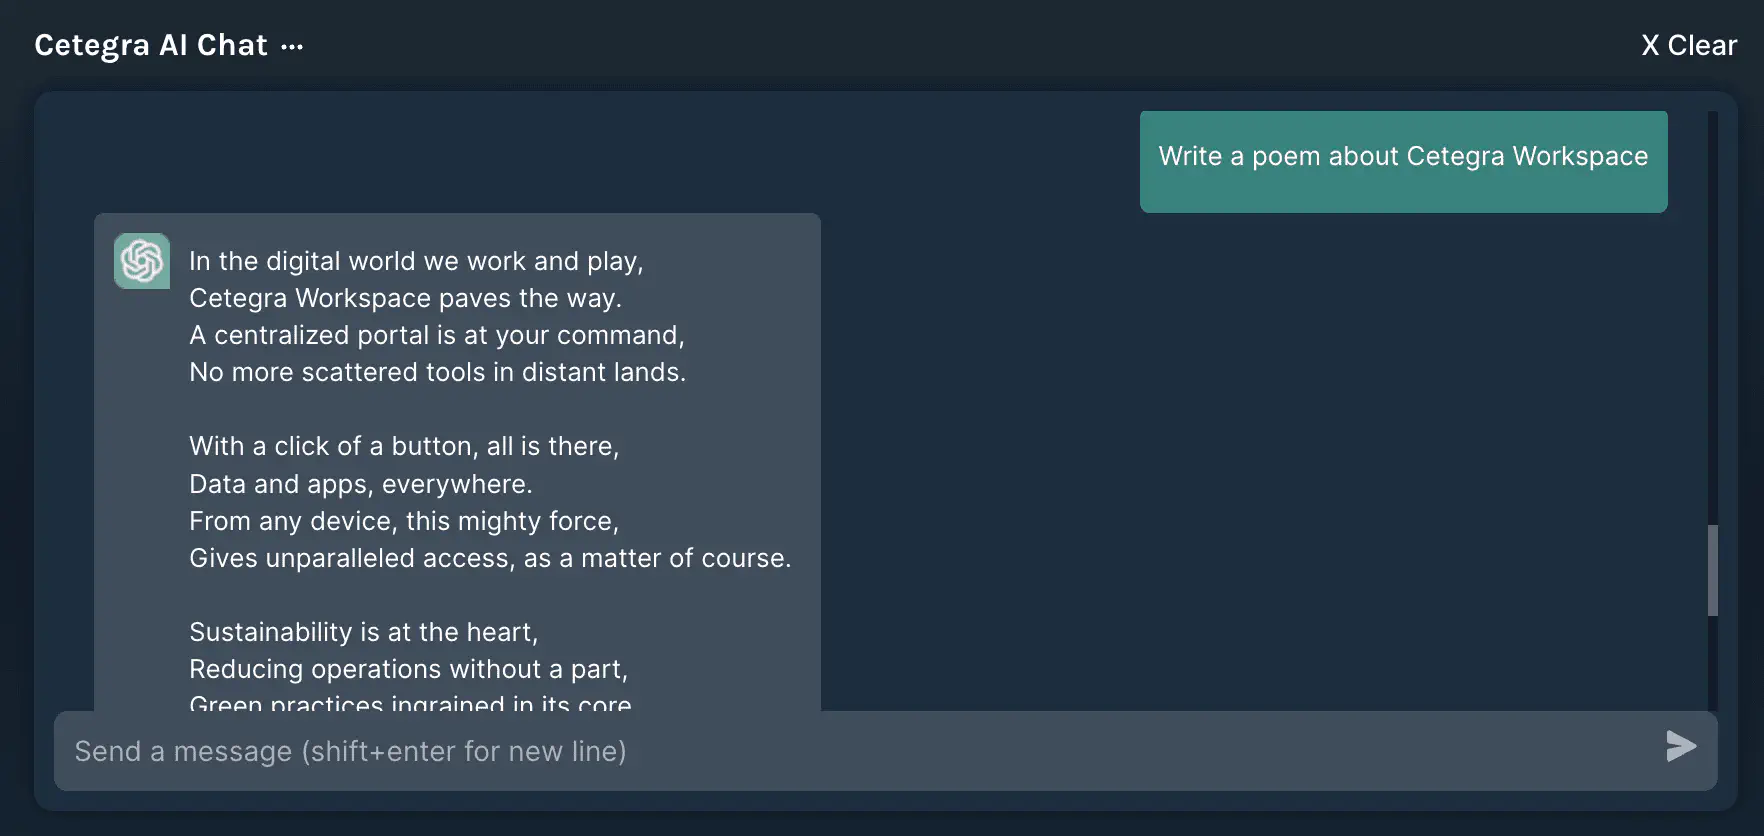
Utilizing Cetegra AI Chat
Cetegra AI Chat is versatile. Whether you’re automating responses, drafting documents, conducting research, brainstorming, translating languages, or more, this AI tool is at your service.
Enabling Cetegra AI Chat
- Login to Cetegra Workspace.
- Go to “Edit dashboard” at the top right.
- Find and enable “Cetegra AI Chat”, then Save.
- On first use, acknowledge the legal disclaimer by writing “I understand”.
For a deeper dive into widget configuration, see here. To start, simply select the Cetegra AI Chat widget within Cetegra Workspace.
Privacy and Security with Cetegra AI Chat
We champion user privacy and data security, especially with tools like Cetegra AI Chat. Your interactions are safeguarded with robust measures, ensuring private and secure AI engagements.
Data Privacy Principles
- Ownership: All data, whether prompts, completions, or training data, is yours.
- No Sharing: Your data is inaccessible to other customers, OpenAI, Microsoft, or third parties.
- No Improvement Usage: Your data isn’t used to refine OpenAI models or other services.
Security Measures
Your data is protected via Azure OpenAI’s robust framework:
- Azure Hosting: Microsoft’s secure Azure environment hosts the Azure OpenAI Service.
- No OpenAI Interaction: The service operates independently of OpenAI-operated services.
- Exclusive Fine-tuned Models: If you choose to fine-tune models, they’re reserved exclusively for your use.
For any privacy or security concerns, our support team is ready to assist.